printable version printable version
Removal and installation of thumb pump (6-cyl. Petrol engine)
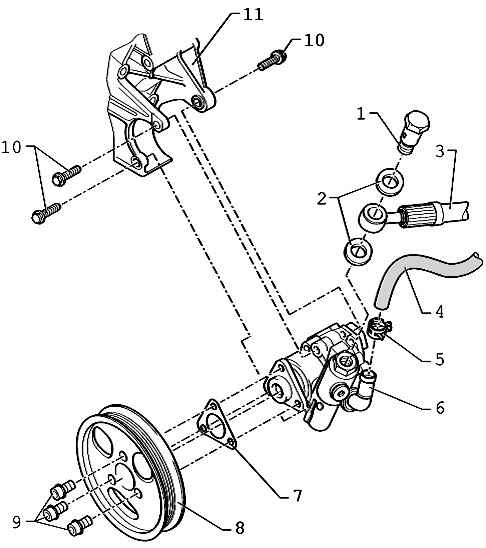
| Fig. 5.35. Components vane pump 1 - a hollow bolt, 40 Nm; 2 - O-rings 16 x 22; 3 - pressure hose; 4 - suction hose; 5 - a spring collar; 6 - vane pump; 7 - an adjusting washer; 8 - a pulley; 9 - Allen screw, 25 Nm; 10 - hex bolt, 25 Nm; 11 - Holder
|
Repair work for the vane pump is not provided. When a fault is determined by the cause of hydraulic testing and leak testing. When a fault vane pump must be replaced.
NOTE In the absence of liquid in a tank should check for leaks the entire steering system. If a leak in the area of pipeline connections in the first place to check for leaks and piping connections and tighten if necessary and wipe dry. Pumps from the warehouse of spare parts are not filled with oil. Therefore, before installing sure to fill hydraulic oil G 002 000 and turn by hand, otherwise there may be noise at movement or damage to the pump. |
NOTE Replace O-rings. Drain the oil no longer use. |
Withdrawal Remove the soundproofing screen engine. Mark the direction of rotation V-belt. Screw the bolt into the threaded hole M8h50 tension roller so to loosen V-ribbed belt. Remove vane pump pulley.
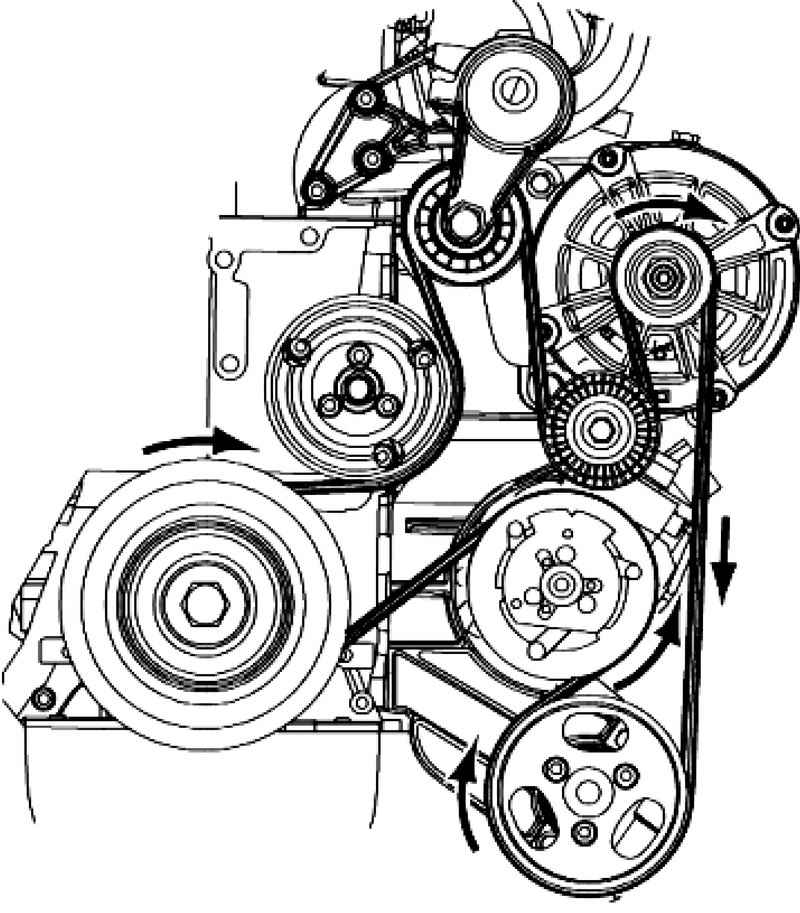
| Fig. 5.36. Contour V-ribbed belt (atomobili with a 6-cylinder petrol engine)
|
NOTE When removing the pulley note underneath shim. It is important to measure and adjust the vane pump. Shim with wheel vane pump is not removed. |
Remove the banjo bolt. Close polyethylene pressure pipe or the like Open the spring clamp and remove the suction hose from the vane pump. Unscrew and remove the vane pump.
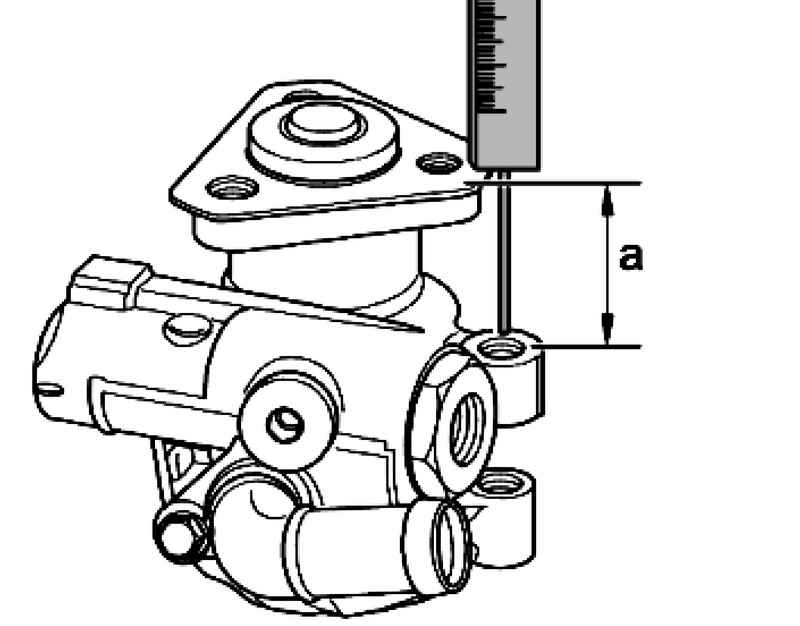
Taken into account when measuring the thickness of the shim. Record the measured value.
Setting Install in reverse order, with the following should be considered. Measure the size of a on the new vane pump without shim (Fig. 5.39). Record the measured value. Determine the thickness of the shim Fill vane pump hydraulic oil. Oil is filled through the suction nozzle vane pump. Rotate the hub by hand as long as oil does not come out on the discharge side. Install the vane pump. Bleed the steering system. Check the fluid level in the hydraulic system. Check steering system for leaks.
Determining thickness of shim Using the measured value is determined by the thickness of the shim. Example: The measurement result of the old vane pump with shim - 33.65 mm The measurement result of the new vane pump without any shim - 32.85 mm. The thickness of the shim: 33,65-32,85 = 0.80 mm. The following shims: Thickness (mm): 0.6; 0.8; 10; 12; 14. Install the vane pump.
Tightening torques Vane pump to the mount - 25 Nm. Pulley to the vane pumps - 25 Nm. Banjo bolt to vane pumps - 40 Nm.
|