printable version printable version
On-board tools, spare wheel, a tire repair kit, the jack
NOTE On-board tools, spare wheel and tire repair kit, removable ball joint towing devices are in the luggage compartment under the raised floor. |
To make it easier to remove the spare wheel or a tool can be inserted into the raised access floor support.
Car tool
| Fig. 1.135. Car tool is located in the luggage compartment under the raised floor. Some of the tools shown here are available only to certain performances of the car
|
The on-board tools include: 1 Screwdriver with hexagon in the handle for screwing and screwing the wheel bolts. The working body of screwdriver replaceable. Screwdriver inserted into the wheel wrench; 2. The adapter bolt locking; 3. Screw in towing eye; 4. Wrench of 10 x 13 mm; 5. A wire stripper to remove the wheel cap or wheel bolt caps; 6. The tool for removal of headlights; 7. Mounting pin for easy installation of the wheels; 8. Wheel key; 9. Jack. Before you put the jack in the toolbox, you must completely screw jack leg. Then, should be attached to the handle of the jack. Detachable ball bearing towing hitch is under the instrument.
Adapter bolt locking It is recommended to always carry a adapter for bolt locking with onboard tools. At the end of the adapter stamped code number wheel bolt locking. If you lose an adapter on this number, you can order a new adapter. Record the code number and keep a record separate from the vehicle.
Collapsible spare tire
To remove the spare tire lift raised floor and place a support under it (Fig. 1.136). Remove the knob counterclockwise rotation. Remove the spare tire.
ATTENTION Collapsible spare tire designed specifically for this car. It can not be replaced by another foldable wheel or put on another car model. This is true for collapsible wheels other car models. On the collapsible spare wheel drive can not mount a normal tire. Make sure that the collapsible spare wheel and tool board securely fastened in the luggage compartment. |
The emergency puncture repair kit Small punctures (up to 4 mm), especially in the treadmill can be eliminated with the help of the emergency puncture repair kit.
NOTE With the emergency puncture repair kit can eliminate air leakage from leaking tire and disappoint her. |
Sealing tires Remove the label ?«max. 80 km / h (50 mph) ?»from the kit and affix it to the field of vision on the front panel. Do not remove the foreign body (eg, a screw or nail) from the tire. Remove the cap from the valve, and with the help of a special screwdriver to slide the included, remove the valve core and place it on a clean place. Pour all of the sealant into the tire from the tank. Follow the Guide app. Remove the container with the valve and replace the valve in the valve. Screw the hose to stop the compressor for pumping the tire valve.
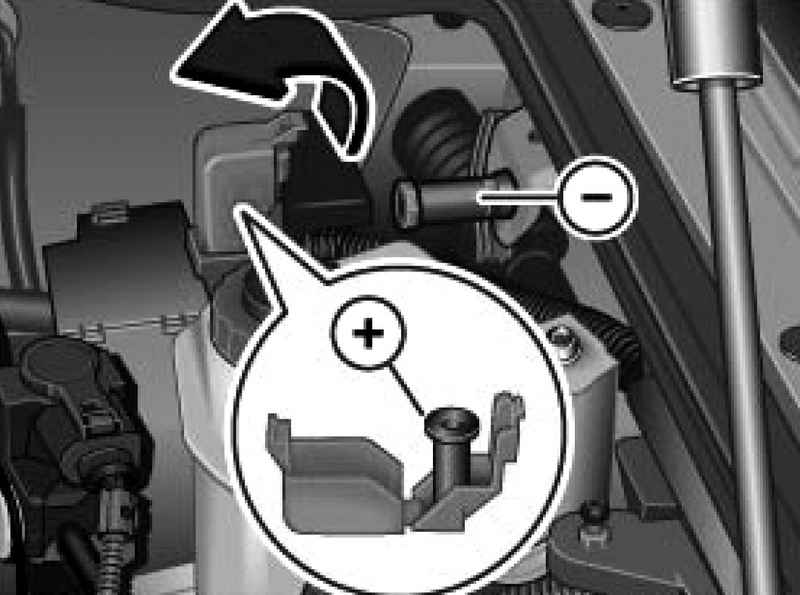
| Fig. 1.137. Pins for connection cables from the auxiliary battery when the engine is started
|
Connect the compressor to the pins for connection of the auxiliary battery (Fig. 1.137). Red compressor cable clamp to the positive "+", the black clamp to the negative "-". Place the cable from the compressor so that it does not touch the rotating parts in the engine compartment. Start the engine and turn on the compressor. Check whether screwed threaded vent plug on the pressure gauge. The compressor has to inflate the tire to a pressure of 2.5 to 3.5 bar. Switch off the compressor at the latest after 10 minutes the compressor must not overheat. If the required tire pressure is not, therefore, damage to the tire is too big. Make tire again sealed failed. Stay where you are and look for help. If you have managed to create in the tire pressure by 2.5 to 3.5 bar and immediately begin to move, but the rate must not exceed 80 km / h. After 10 minutes of motion check the tire pressure. Reconnect the compressor hose (See above.) And read the pressure gauge. If the pressure is below 10 mindvizheniya 1.8 bar, stop the car and contact the nearest service station. If, after 10 minutes, traffic pressure above 1.8 bar - adjust the tire pressure to the nominal (see. Sticker). Drive at a speed not exceeding 80 km / h to the nearest tire center. Repair or replace the damaged tire. The emergency puncture repair kit is only intended for when a flat tire to get to the nearest tire center. Repair or replace the damaged tire. Follow the instructions attached to the kit manual. The kit can be used at temperatures up to -20 ?° C. Watch the expiration date set. The expiration date or after use of the kit, contact service company Volkswagen and replace the tank with sealant. The kit contains: - hose; - The capacity of the sealant; - compressor; - Pressure gauge (with threaded vent plug); - Warning labels with speed; - Guide to use.
Sealing tires Remove the label ?«max. 80 km / h (50 mph) ?»from the kit and affix it to the field of vision on the front panel. Do not remove the foreign body (eg, a screw or nail) from the tire. Remove the cap from the valve, and with the help of a special screwdriver to slide the included, remove the valve core and place it on a clean place. Pour all of the sealant into the tire from the tank. Follow the Guide app. Remove the container with the valve and replace the valve in the valve.
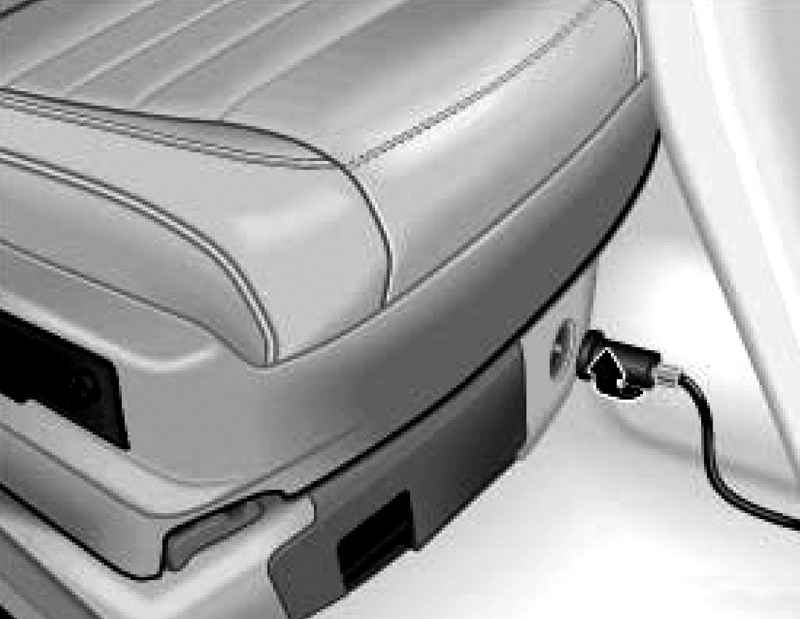
| Fig. 1.138. Right front seat fitting with hose connection
|
Screw one end of the hose to the tire valve and the other end of the screw on the union under the right front seat (Fig. 1.138). Start the engine. Check whether screwed threaded vent plug on the pressure gauge. Push the lever under the pressure gauge. Leave the engine to work up until the tire pressure reaches a value of 2.5 to 3.5 bar. If the required tire pressure is not, therefore, damage to the tire is too big. Make tire again sealed failed. Stay where you are and look for help. If you have managed to create in the tire pressure by 2.5 to 3.5 bar and immediately begin to move, but the rate must not exceed 80 km / h. After 10 minutes of motion check the tire pressure. Connect the hose again to the tire valve and fitting (see. Above). Consider reading the tire pressure on the gauge. If, after 10 minutes, traffic pressure above 1.8 bar - adjust the tire pressure to the nominal (see. Sticker). Drive at a speed not exceeding 80 km / h to the nearest tire center. Repair or replace the damaged tire.
|