printable version printable version
Control Panel CD-receiver
NOTE CD-receiver has a protective coding. If after the CD-receiver is not operating and the display label SAFE, this means that the CD-receiver is locked. |
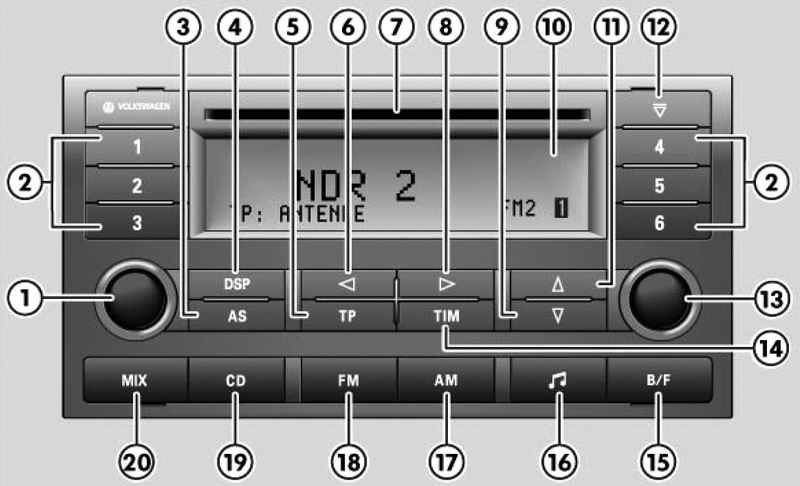
| Fig. 1.73. Controls CD-receiver: 1 - swing-lever handle; 2 - key stations; 3 - automatically saves the six best audible radios; 4 - Digital Sound Processor (sound choice of options); 5 - on / off road radio options; 6 - Go to the last memorized in the road post (TIM) or the latest traffic radio transmitter; 7 - mine for CDs; 8 - go to the last memorized in the road post (TIM) or the nearest transmitter traffic reports; 9 - moves to the previous radio station or CD tracks; 10 - reading on the display; 11 - Go to the next station or next CD track; 12 - Release of the CD; 13 - swing-lever handle; 14 - Listen to and memorizing of road communications; 15 - Balance / fader; 16 - tone controls (bass, middle and treble); 17 - Switching on the medium-range (MW) and memorizing stations; 18 - Switching to the short-range (MW) and memorizing stations; 19 - CD playback; 20 - Listen to the CD tracks
|
Using the audio system while driving Modern traffic conditions demand constant attention of drivers. Modern car radios - along with entertainment features - offers drivers a variety of traffic information on traffic conditions, road conditions, traffic jams, etc. In order to take advantage of traffic information, should be closely acquainted with the numerous possibilities of modern car radios
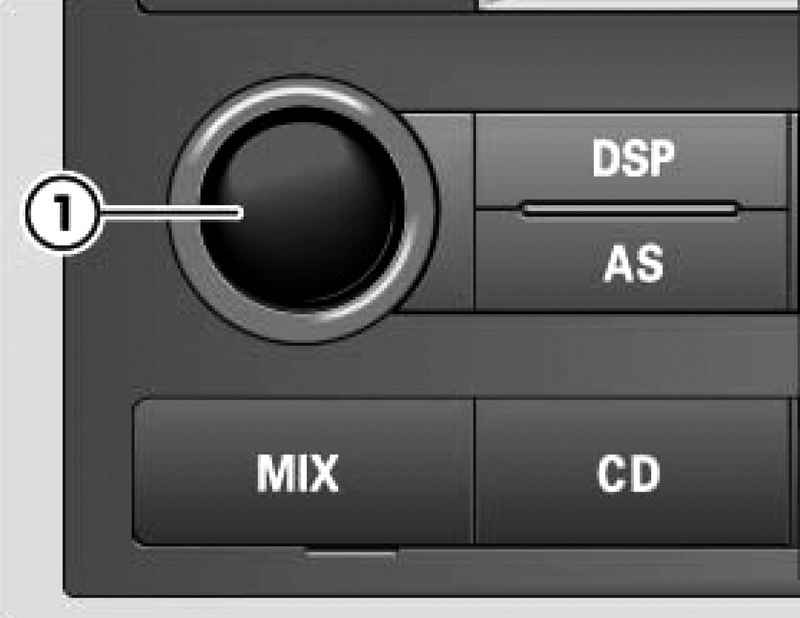
Listening to the radio and CDs - on / off Easy touch swing-lever handle 1 can enable or disable the CD-receiver. When it starts to work with the same volume the radio, which was tuned to before turning off the CD-receiver. If when the CD-receiver, remove the key from the ignition, CD-receiver is automatically turned off. When the reverse is inserted into the ignition key, CD-receiver automatically turns on. When taken out of the ignition key can be turned on CD-receiver lightly pressing the rotary-push knob 1. It will automatically turn off after about an hour to prevent battery discharge. By repeatedly pressing the knob again, you can turn on CD-receiver.
Adjusting the volume (Volume)
By turning the volume control (Fig. 1.74) appears on the display Volume and Volume selection bar. In this band graphically represented volume. The band disappears after about five seconds after you change the volume.
NOTE If you set the minimum volume level, the volume selection bar with the addition of MIN is in a modified form on the display. You have the opportunity to fix the volume when the CD-receiver, regardless of the position of the volume control. |
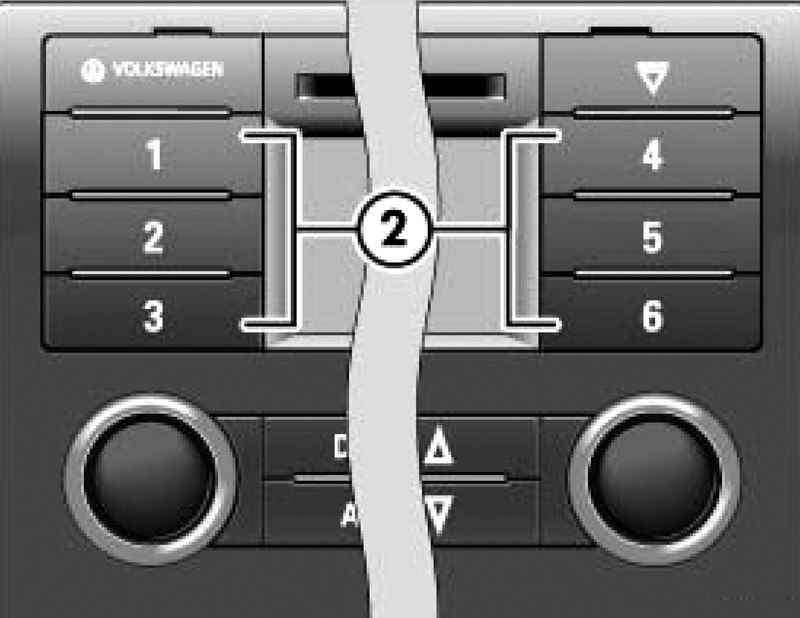
Storing stations (Manual Memory) Select the desired range. Tune in to the desired station. Press and hold the key (key stations 1-6) under which you go to make this station as long as the fade and broadcast signal is heard.
The radio station entered in the memory. After storing stations is displayed station key number (if, for example, brought in memory of the radio station will be a key 3 digit "3"). You can add memory up to 24 radio stations - 6 stations on each of the four bands. FM1 / FM2 = 6 stations, AM1 / AM2 = 6 stations.
NOTE Make sure that you make in memory of the stations present on the display the station name instead of running line, otherwise this string will be stored instead of the station name. |
CD changer - CD mode Fast light-touch keys 1 through 6 can be connected with the CD-changer load into the magazine a certain CD. Loaded CD will be displayed - from CD1 to CD6. If in the CD-changer is no shop, the display will read: ?«NO MAGAZINE?».
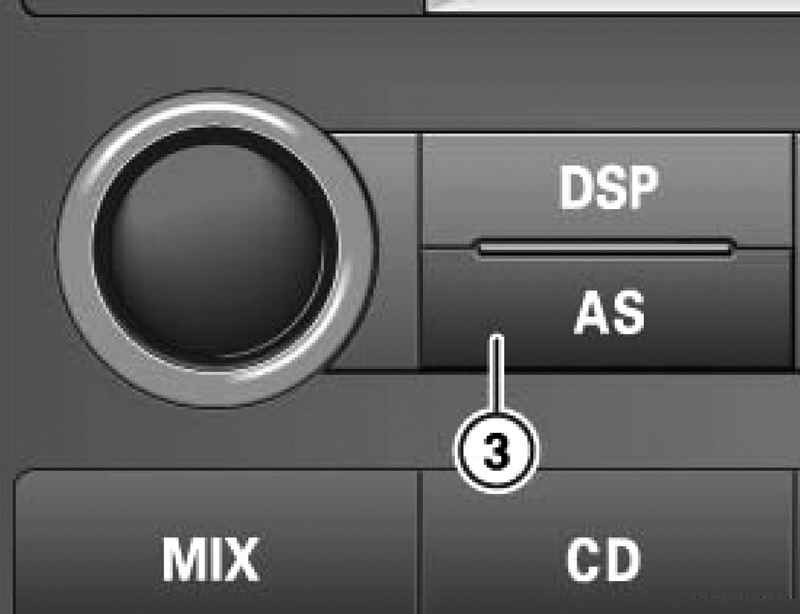
Auto Memory When you press the AS carried out automatically saves the six stations with the strongest signal levels FM2, and AM2.
Press and hold the button for about two seconds AS. The display shows ?«AUTOSTORE?». Then it will be automatically entered in the memory of the six stations with the strongest signal in the memory level FM2 and AM2.
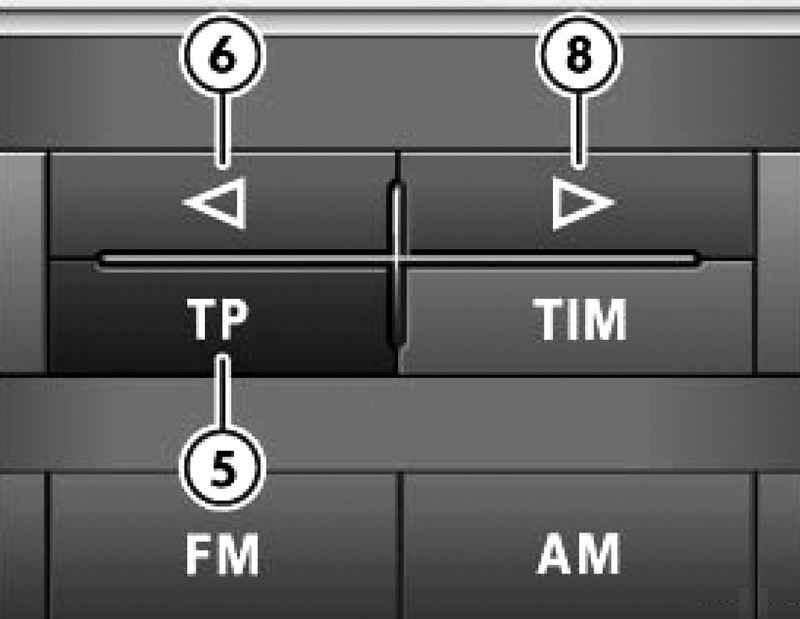
Road Radio TP (Traffic Program)
Through 5 keys (TP - Traffic Program), you can control the traffic radio. Gently pressing the TP can be turned on or off TP. At the same time function is activated TA- ?«Bereit-schaft?» (?«Traffic Announcement?» - road posts) When TP function is active, the display shows TP (eg, TP: ?«Antenne"). If you do not find any radio station Road, the display TP: ?«No TP?». If the station you tuned, do not transmit traffic announcements, the tuner automatically tunes to the radio station of the road, which has been configured before (?«Last Station Memory?»). If the station is no longer heard, the unit automatically starts to search for the nearest station on the frequency of the received radio traffic. The display shows TP: ?«TP-Seek?». When tuned to any TP-station appears on the display TP: TP-station name (for example: ?«TP: Antenne").
Name and frequency of stations which transmit traffic information are shown on signs along the highways and partly on other roads.
TA-ready mode When an active mode TA-readiness can listen to traffic information. If the adjusted volume is very low, or select another mode (radio, listening to CDs), despite this, the traffic messages are transmitted to the previously programmed volume. If the transmitter that transmit traffic information is already out of range, about 30 snezametno, the background begins search for new radio stations Road. During a traffic announcement audio system automatically switches to mono sound, and digital DSP processor translates the sound system in the sound mode ?«TALK?».
NOTE As in the CD-tuner receiver are two settings on the transmitters of traffic messages is transparent to the listener and regardless of the setting on the active received station. Only during a traffic announcement can be heard the TP-transmitter, which set a second tuner. If the vehicle leaves the coverage area of the TP-transmitter, which set up the tuner automatically starts searching for a new TP-transmitter. |
Road Radio - change of TP-transmitter You can radio traffic keys 6 and 8 to select at will a TP-transmitter. Gently press the keys 5 you can enable or disable Traffic Message TP. At the same time activate the function TA-readiness. Key 8 can tune in to another TP-nearest transmitter. Key 6 You can tune to the previous TP-transmitter. The list of TP-received transmitters in the background is automatically updated.
Road Radio - automatic adjustment With the function Auto TP is possible to activate automatic adjustment to TP-transmitter with the strongest signal. Gently press the keys 5 to enable or disable the function of a traffic announcement TP. At the same time activate the function TA-readiness. Press and hold down the 6 or 8 as long as the display shows the indication TP: ?«auto TP?». Release the key 6 and 8, which has been pressed. After about five seconds, an alarm sounds and the indication TP: ?«auto TP?» will blink. The tuner searches for TP-transmitter with the strongest signal.
Road Radio - interruption of traffic announcement During a traffic announcement you wish to abort, tap TP For a long trip a traffic announcement, hold down until TP until the display shows a message TP: ?«OFF?». It may happen that send traffic to interrupt a message, for example: - Road access does not apply to the portion of the path that the car should be. - Traffic message is too long, and all the most important has been said. Once interrupt a message, will resume the previous operation - or the transfer of conventional radio, or listening to CDs. Interrupted road links will be added to the drive TIM, and if necessary it will be possible to listen to later. However, the following new road connections again interrupts the hearing radio or CD.
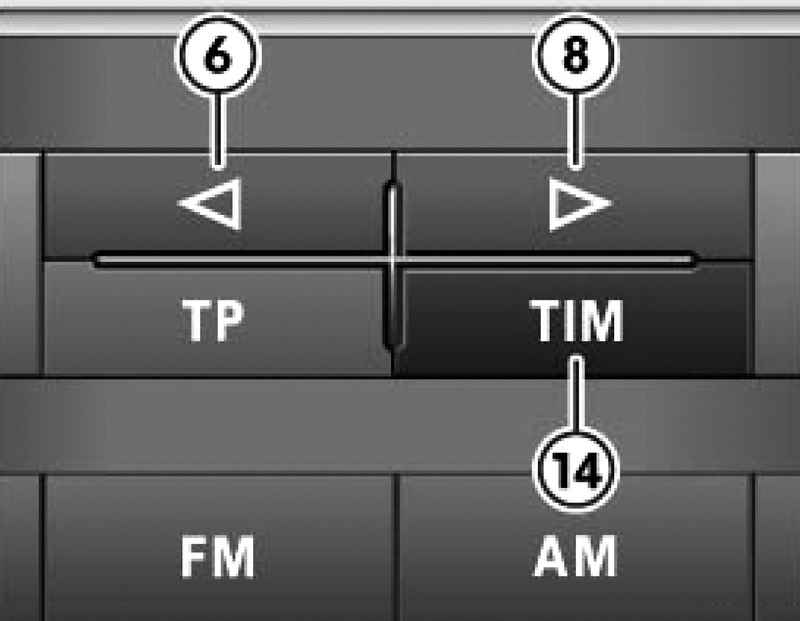
Listening to the included memory traffic messages in any order Press 14. Through the keys 6 and 8 move forward on the road to reports (key 8) or backward (button 6) or the beginning of a communication.
Listening in chronological order - Press 14. Transferring recorded traffic reports starts with the last and next to the first. The display can be shown, for example: TP - ?«Memo 2/3?». What does it mean: ?«TP-Memo?»: the transfer of the stored traffic reports. "2/3": The second message of the three included in the memory. If there were no traffic announcement appears on the display: ?«No TP-Message?».
Listening to CDs and radio road In order not to interrupt the listening CD, hold down 5 until the display shows message TP: ?«OFF?». If before pressing the 19 included road the radio, listening to traffic information interrupt CD. If the vehicle leaves the coverage area of the TP-transmitter, which set up the tuner automatically starts searching for a new TP-transmitter. By pressing the key 5 can interrupt the transmission of the traffic announcement and continue listening to the CD. Interrupted road links will be added to the accumulator 19, and if necessary it will be possible to listen to later. However, the following new road connections again interrupt CD playback.
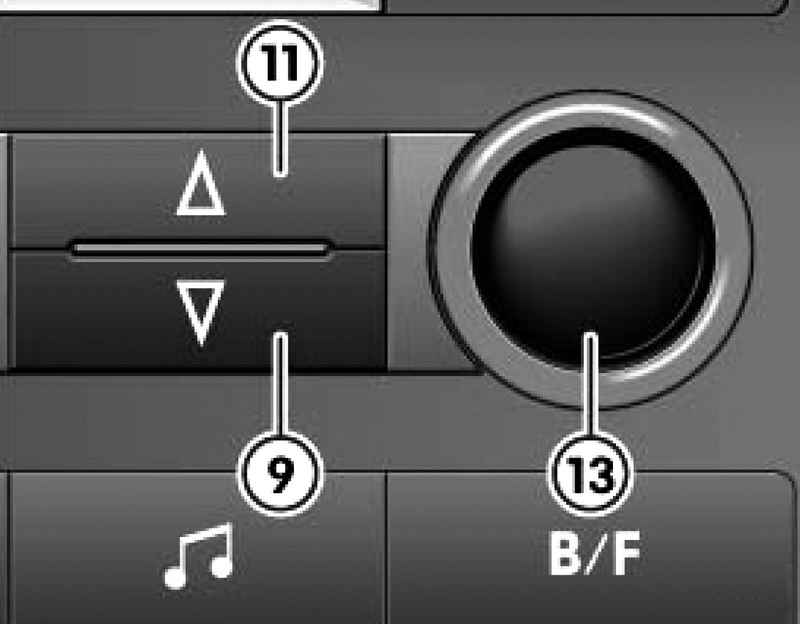
Search Keys radio
Touch Search 11 or 9 will search for a station in the desired direction, then selects the first station with a strong signal and it will be heard.
The list of radio stations Press the button to find 11 or 9 can be moved up and down on the list of radio stations. Your tuner continuously monitors all the radio reception is good. When the tuner automatically all available radio stations are entered in the list in the order of their PI-codes (?«Programm-Identifikation?»). For PI-code identifies the radio tuner, for example: ?«NDR 2".
NOTE Search is possible only in the medium range (the AM must be pressed first). The choice on the list is possible only in the range of ultrashort (first must be pressed) FM. Non-RDS stations are located at the very end of the list of stations. |
Selecting Tracks Touch the search key 11 or 9, you can select the desired track on the CD, "flipping" tracks up or down. The selected track is shown on the display (for example: ?«TRACK 12").
Fast forward and backward During playback, press and hold the search or 9 to 11 until you reach the desired location. Then release the 11 or 9.
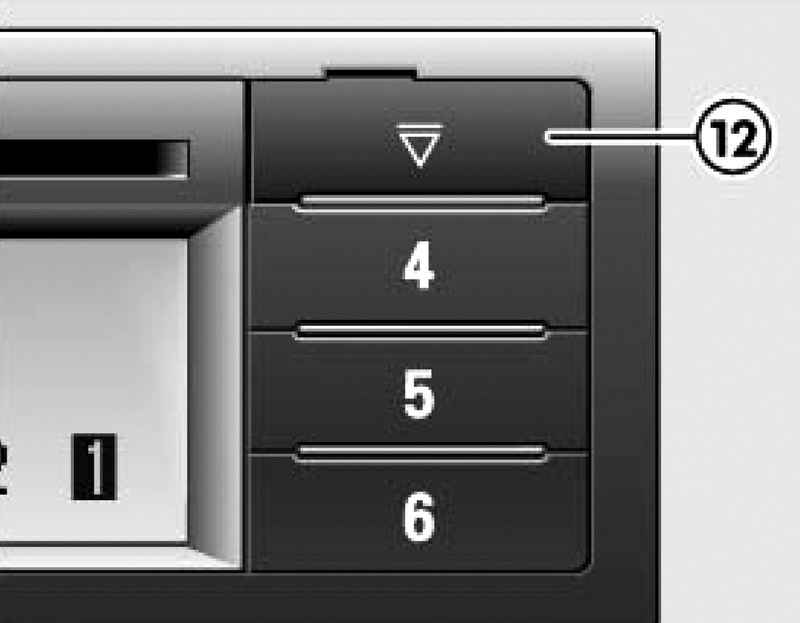
Removing a CD
Press 12 is compact disc is removed from the shaft (Fig. 1.80).
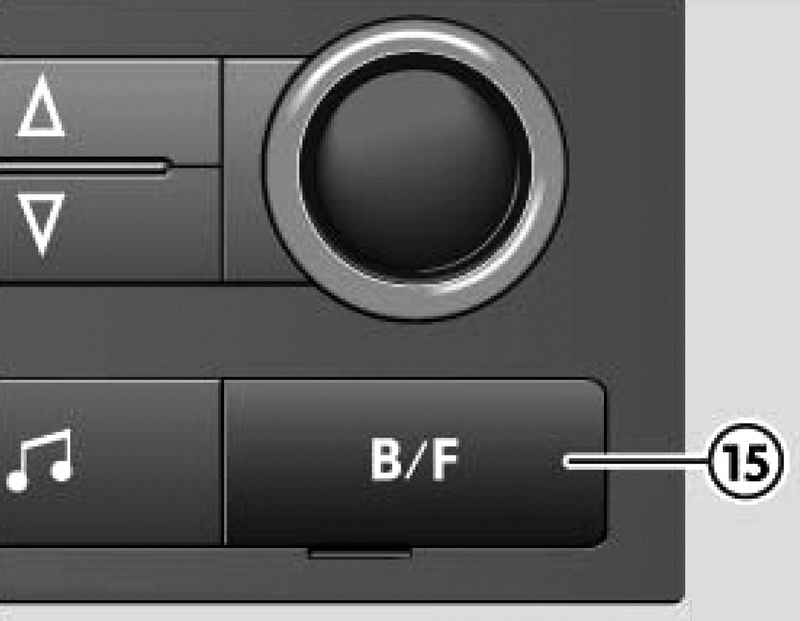
Adjusting balance / federalism
Balance (?«BALANCE?»), fader (?«FADER?»). Press 15 to select that regulate ?«BALANCE?» (to the front) or ?«FADER?» (at the rear). Turn the knob 13 to set the desired distribution. To confirm the adjustment, press the knob. With the function ?«BALANCE?» set the volume of speakers on the left and the right. With the function ?«FADER?» set the volume speaker front and rear.
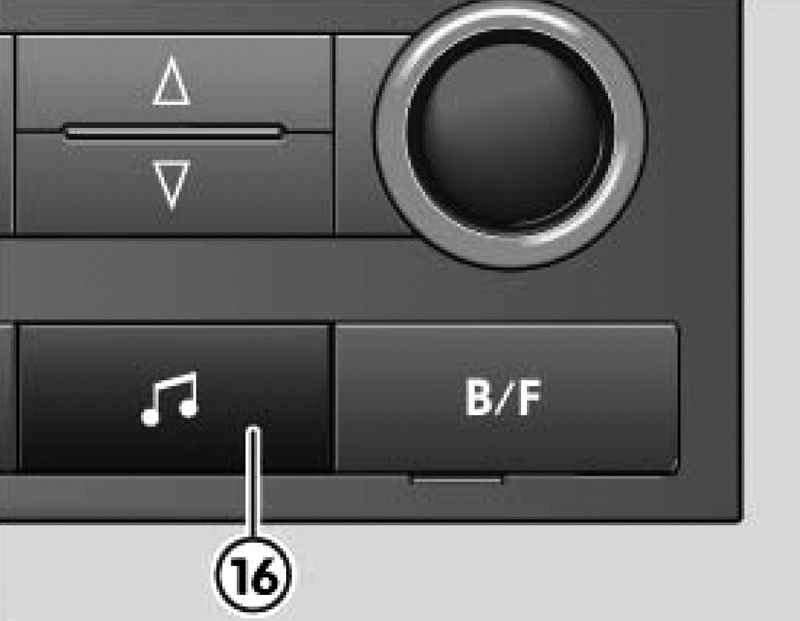
Adjusting the tone Adjusting the bass (?«BASS?»), medium (?«MIDDLE?») and high (?«TREBLE?») frequencies.
Press 16 to then could adjust the bass ?«BASS?», mean ?«MIDDLE?» or high ?«TREBLE?» frequency (Fig. 1.82). Turn the knob 13 to adjust certain frequencies. Pressing the pen 13 go to adjust other frequencies. The display shows adjustable frequency ?«BASS?», ?«MIDDLE?» or ?«TREBLE?» and control strip. This bar graph represents the variation adjust the bass, mid and high frequencies. The bar disappears after about five seconds after the adjustment.
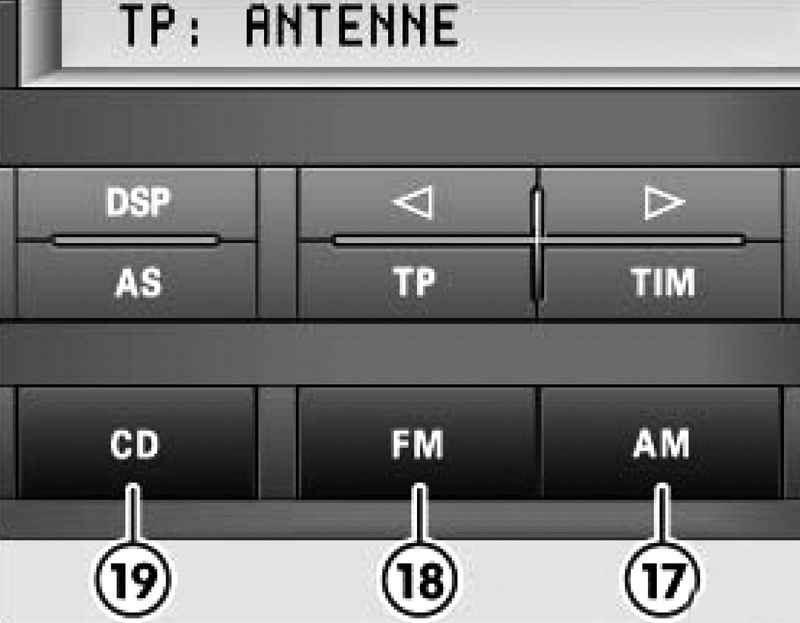
Keys for selecting an audio source
| Fig. 1.83. Keys for selecting an audio source
|
Key AM (medium-range radio). By pressing the key 17 can get into the first sub-band medium wave range. Pressing the AM can be reached in the second sub-band medium wave range. The display for the first AM1 or AM2 for the second sub-band. Key AM (str trakorotkovol new range radio). By pressing the key 18 can get into the first sub-band VHF range. If you press FM can be reached in the second sub-band VHF range. The display for the first FM1 or FM2 are for the second sub-band. Key CD (CD playback). One pressing 19 selects CD playback on the built-in CD-receiver. Repeatedly pressing CD by connecting CD-changer, you can choose between CD-receiver and CD-changer.
Indications when listening to the radio
| Fig. 1.84. Indications when listening to the radio
|
A - road radio (TP) and the name of the radio transmitter road. In - the name of the radio station you are listening. C - subband (FM, AM). D - rlavisha under which it entered in the memory of the radio station. When the frequency is displayed instead of the RDS station name.
Protective Coding Protective coding makes it impossible for unauthorized use of the CD-receiver after its removal from the car. Suitable protective coding for technical reasons not possible on all car models. Until recently, you were forced each time after removing the CD-receiver or disconnect the battery to manually remove the electronic lock. With the introduction of the new user-friendly protective coding situation changed now after the very first entering a code number into the CD-receiver it is further stored in the memory of the car! If the power has been turned off, CD-receiver will automatically compare "its" code number with the one that was introduced in memory of the vehicle. If the code numbers match, the CD-receiver is operational in a few seconds. There is no need to remove the electronic lock manually. If the code numbers do not match, such as CD-receiver installed on another car, electronic lock should be removed manually.
Radio card The code number with the serial number CD-receiver is included in the radio card (card for the CD-receiver). Radio card should be stored in a safe place and in any case not in the car.
NOTE If after the CD-receiver appears on the display ?«SAFE?» - together with a small number 2 on the left - this means that the device is locked. Now the CD-receiver should be left switched on for one hour, and then make an attempt to remove the lock. |
Wrong code number If when removing the electronic lock mistakenly enter the wrong code number, the display begins to blink first ?«SAFE?», and then it lights up continuously. Now you can repeat the whole process of unlocking one more time. The number of attempts is shown in the display. If you still enter the wrong code, for a further hour should abandon attempts to enter the code. Check that the device is locked, it is possible for a small number 2 on the bottom left of the display. After one hour, during which the CD-receiver must remain on, the number of attempts the reading disappears and you can again begin to unlock in the same sequence. The cycle - two attempts, then an hour wait - you can repeat and repeat.
|