printable version printable version
Removing and installing cylinder head
ATTENTION The connection head of the block and an aluminum cylinder with a ramp crankshaft bearings made by anchor bolts. It is necessary to replace both the cylinder head. When loosening and unscrewing the cylinder head bolts warping occurs cylinder. |
NOTE There are shown a number of components of the first cylinder. The mirror image, they correspond to the components of the second row of cylinders. |
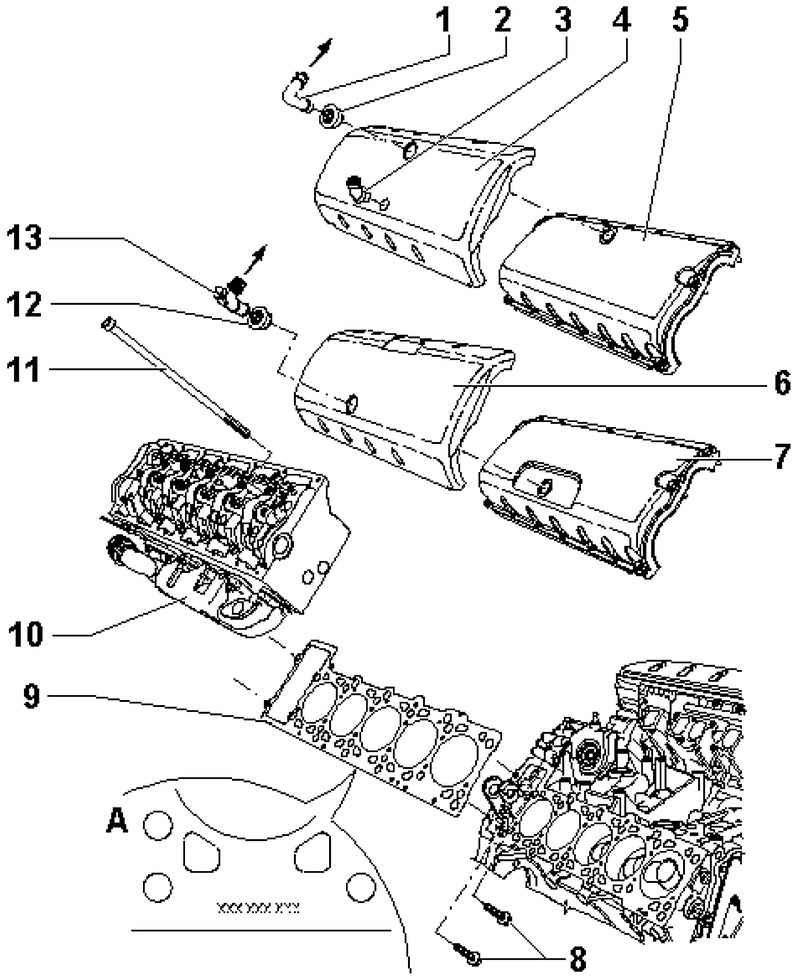
| Fig. 2.201. The components of the cylinder head 1 - a connecting hose (on vehicles with engines of BLE and BWF); 2 - Seal (on vehicles with engines of BLE and BWF); 3 - the holder (on vehicles with engines of BLE and BWF); 4 - Acoustic Cover (on vehicles with engines of BLE and BWF); 5 -kryshka cylinder head (on vehicles with engines of BLE and BWF); 6 - Acoustic Cover (vehicles with letter designations Engine AYH, BKW); 7 - the cylinder head cover (for vehicles with letter designations Engine AYH, BKW); 8 - a bolt to 20 N ??? m; 9 - cylinder head gasket; 10 - cylinder head; 11 - a bolt of the cylinder head; 12 - sealing lip; 13 - adapter (for vehicles with letter designations Engine AYH, BKW)
|
Withdrawal Remove the engine and transmission. Remove the soundproof cover and cylinder head cover to the cylinder heads. Remove the fuel pump and the pump tandem with the cylinder head. Install the crankshaft position of the dead point of the first cylinder, check valve timing. Remove the pinion gears camshafts. Remove the mounting bolts between the timing cover and block head first and second row of cylinders.
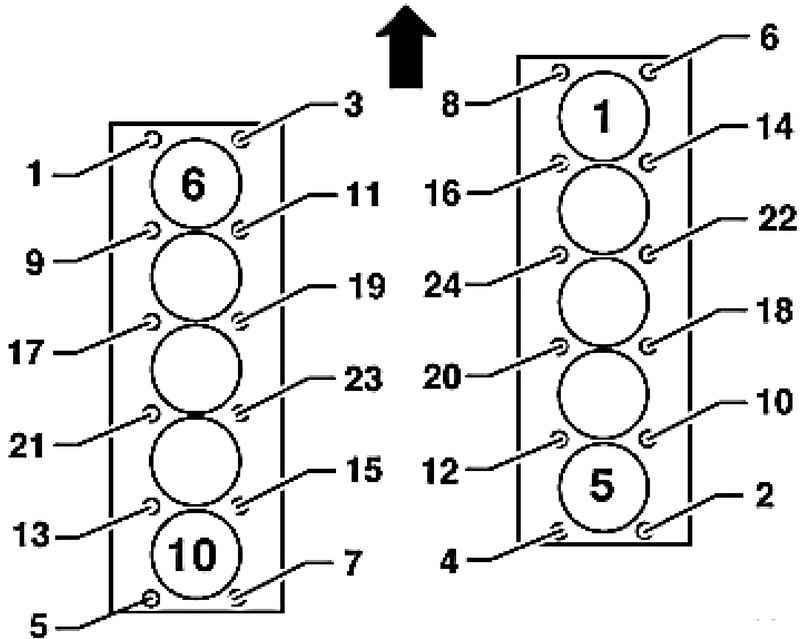
| Fig. 2.202. Sequence of unscrewing the bolts fastening the cylinder head
|
Bolts cylinder head Loosen and unscrew in sequence ((Fig. 2.202) shows the direction of travel). With the help of an assistant, carefully remove the cylinder head.
NOTE Keep the cylinder head must be very careful in order to avoid damage. Put into the cylinders a clean cloth to between the piston and the cylinder bore no dirt and the remains of emery. Check that the cooling liquid is also no dirt and the remains of emery. Carefully clean the sealing surfaces of cylinder head and cylinder block. Thus there should be no longer scratches and burrs (using grit sandpaper it should be less than 100). |
Setting Before installing the cylinder head set crankshaft to position the dead point of the first cylinder.
NOTE Always replace the cylinder head bolts. A new cylinder head gasket must be removed from the packaging directly before installation. Install the cylinder head gasket with the same index ?«Dicke / Thickness" Removing the door seal. With gasket should be handled very carefully. Damage to the silicone layer and single-convolution connections lead to a loss of tightness. |
Rotate the crankshaft against the rotation direction of the motor shaft to until all the pistons are not uniformly be set to lower dead point. Install gasket cylinder head.
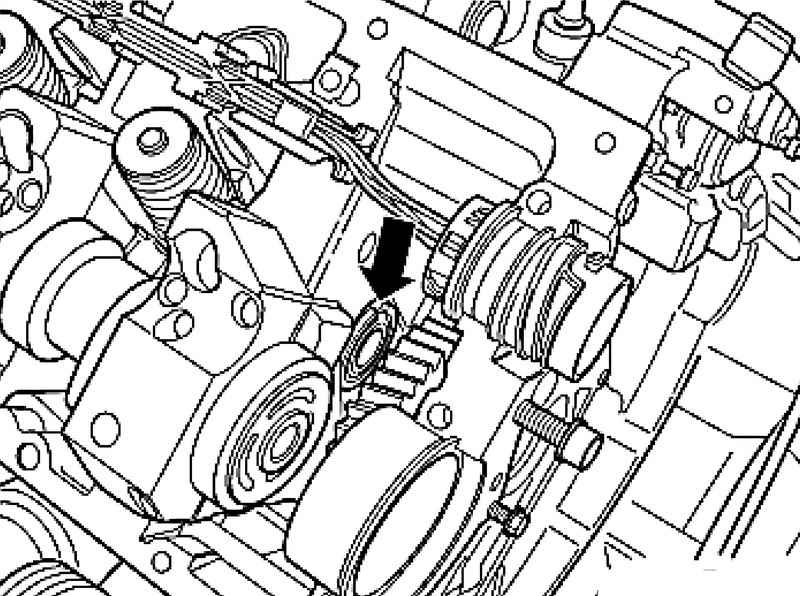
Install the cylinder head, taking into account the position of the compensation pads (Fig. 2.203), cylinder head bolts and washers install and tighten by hand.
ATTENTION All the cylinder head bolts except (for tightening sequence) number 1, 2, 17 and 19 must be equipped with washers with the groove. |
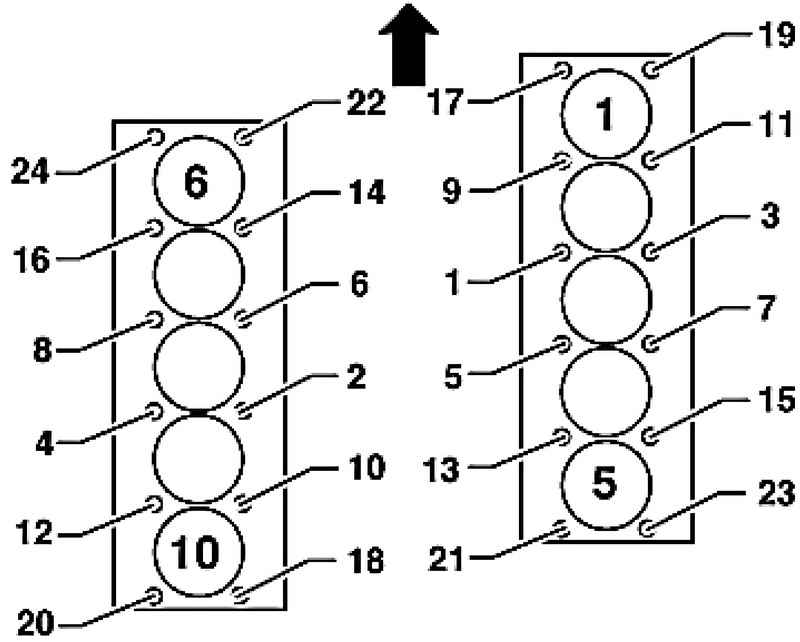
| Fig. 2.204. The sequence of tightening the bolts of the cylinder head
|
Tighten the cylinder head in four stages in the sequence indicated torque ((Fig. 2.204) shows the direction of motion). 1 - Apply the torque wrench: - Stage 1 = 30 Nm; - Phase 2 = 60 Nm. 2 - Next, turn the key in the usual: - Stage 3 = tighten 1/2 turn (180 ?°); - Phase 4 = tighten 1/2 turn (180 ?°). Install the camshaft pinions. Adjust the timing.
|