add to favorites contacts sitemap
REPAIR MAINTENANCE OPERATION OF MOTOR VEHICLES
Volkswagen Touareg (from 2003 to 2006, the year of issue)

general info. full specifications. diagnostics. hints. tips. tricks
Volkswagen Touareg
Home
 
Volkswagen
Touareg
Operation and maintenance of car
Engine
Preliminary checks on the car
The mechanical part (petrol engines 3,2L)
Removal of the power unit
Removal and installation of the left and right engine support cushions
Removing and installing drive plate
Removing and installing oil seal on the flywheel side
Replacing the oil seal on the side of the crankshaft vibration damper
Replacement of sealing flange on the side of the crankshaft vibration damper
Removing and installing crankshaft
Removing and installing the side cover
Removing and installing cylinder head cover
Removal and installation of the cylinder head
Checking the valve timing
The timing
Removing camshafts
Installing the camshaft
Checking the axial displacement of the camshaft
Marking camshafts
Replacing valve stem seals
Checking the valve guides
Processing valve seat
Valve sizes
Checking the pistons, piston rings and cylinder bore
The mechanical part (petrol engines 4,2L)
The mechanical part (diesel engines 5,0L)
Removing and installing subframe
Pressurization system (diesel engines)
Cooling system (petrol engines)
The cooling system (diesel engines)
Lubrication (petrol engines)
Lubrication system (diesel engines)
Injection System (petrol engines)
Fuel injection system (diesel engines)
Exhaust
FUEL (beninovye engines)
Tables
Transmission
Chassis
Steering Gear
Brakes
Onboard electric
Body
diagrams


Hit Counter by Digits


print page printable version

Replacement of sealing flange on the side of the crankshaft vibration damper


Withdrawal
Result a radiator framework in service position.
Remove ribbed belt.
Remove the vibration damper. For this secure vibration damper with a key to lock the T10069.
Remove the oil pan.
Remove the mounting of the sealing flange.
Remove any residual sealant from the sealing surfaces.

Setting
Remove the remaining oil on the crank pin of the crankshaft with a clean cloth.
Cut the tip of the tube on the front mark (O holes about 3 mm).

The scheme applying sealant
Fig. 2.50. The scheme applying sealant


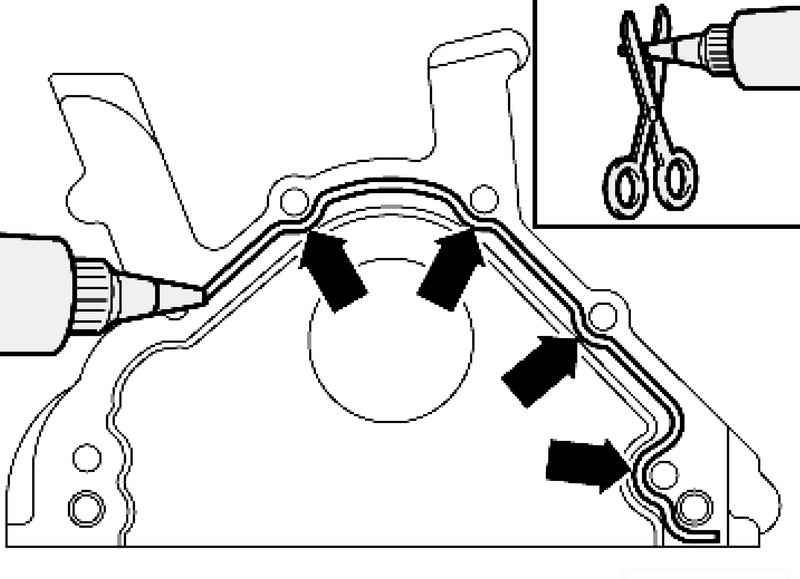
Apply a bead of sealant thickness of about 2-3 mm, as shown in Figure 2.50 on the clean surface of the sealing flange.

NOTE
Before applying the sealant gland cover with a clean cloth.
The sealant layer should be no thicker than 2-3 mm, because otherwise the excess sealant may enter the sump and clog the strainer in maslozabornom nozzle.
Observe the shelf life of the sealant.
The sealing flange must be installed within 5 minutes after the application of the silicone sealant.

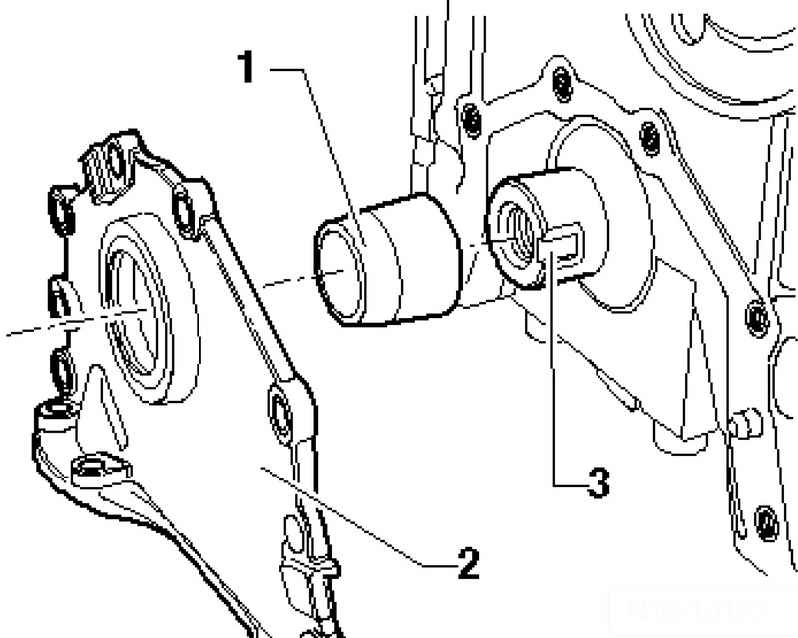
Install the guide bushing 1 T10215 / 1 on the front of the neck of the crankshaft 3.

Installation of a sealing flange with oil seal
Fig. 2.51. Installation of a sealing flange with oil seal


Then gently insert the flange sealing gland 2 through the guide sleeve (Fig. 2.51).
Screw the flange of the cylinder block.
Install the oil pan.

NOTE
Fixing bolt vibration damper should be replaced.

Tighten the fixing bolt with a torque wrench VAG 1601.
Install vibration damper and lock it counter support T10069.
Tighten the new fixing bolt torque of 100 Nm + 1/4 turn (90 ?�).
Install poly V-belt.


« previos page
Replacing the oil seal on the side of the crankshaft vibration damper
next page »
Removing and installing crankshaft

Copyright © 2010 AutoManuals.biz. Trademarks belong to their respective owners. All rights reserved.