add to favorites contacts sitemap
REPAIR MAINTENANCE OPERATION OF MOTOR VEHICLES
Volkswagen Touareg (from 2003 to 2006, the year of issue)

general info. full specifications. diagnostics. hints. tips. tricks
Volkswagen Touareg
Home
 
Volkswagen
Touareg
Operation and maintenance of car
Engine
Preliminary checks on the car
The mechanical part (petrol engines 3,2L)
Removal of the power unit
Removal and installation of the left and right engine support cushions
Removing and installing drive plate
Removing and installing oil seal on the flywheel side
Replacing the oil seal on the side of the crankshaft vibration damper
Replacement of sealing flange on the side of the crankshaft vibration damper
Removing and installing crankshaft
Removing and installing the side cover
Removing and installing cylinder head cover
Removal and installation of the cylinder head
Checking the valve timing
The timing
Removing camshafts
Installing the camshaft
Checking the axial displacement of the camshaft
Marking camshafts
Replacing valve stem seals
Checking the valve guides
Processing valve seat
Valve sizes
Checking the pistons, piston rings and cylinder bore
The mechanical part (petrol engines 4,2L)
The mechanical part (diesel engines 5,0L)
Removing and installing subframe
Pressurization system (diesel engines)
Cooling system (petrol engines)
The cooling system (diesel engines)
Lubrication (petrol engines)
Lubrication system (diesel engines)
Injection System (petrol engines)
Fuel injection system (diesel engines)
Exhaust
FUEL (beninovye engines)
Tables
Transmission
Chassis
Steering Gear
Brakes
Onboard electric
Body
diagrams


Hit Counter by Digits


print page printable version

Replacing the oil seal on the side of the crankshaft vibration damper


NOTE
If the plastic sealing flange, the gland can not be replaced individually - must be replaced by a sealing flange.

Withdrawal
Result a radiator framework in service position.
Remove ribbed belt.
Remove the vibration damper. For this secure vibration damper with a key to lock the T10069.

Setting the hook under the lip gland
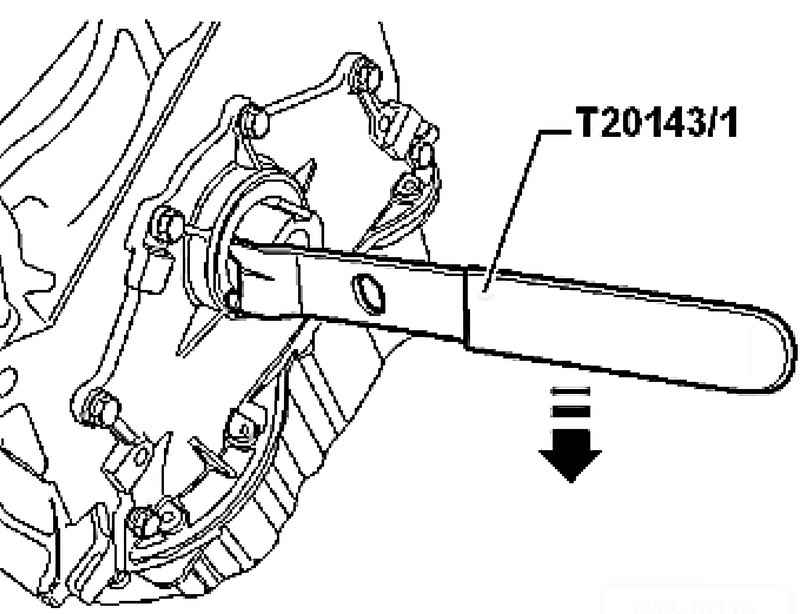
Fig. 2.48. Setting the hook under the lip gland


Insert the hook T20143 / 1, as shown in Figure 2.48, working under the seal lip.
Lean hook - T20143 / 1 - on flange, pry out the oil seal in the direction of the arrow and remove it.

Setting
Remove the remaining oil on the toe of the crankshaft with a clean cloth.
Push guide sleeve 1 (T10215 / 1) on the front of the toe of the crankshaft.
Then gently 2 Push the gland over the guide sleeve as far as possible.

The order of pressing parts
Fig. 2.49. The order of pressing parts


Press in the oil seal until it stops using the mandrel 3 (T10215 / 2). To do this, use the old retaining bolt 4 vibration damper (Fig. 2.49).

NOTE
Fixing bolt vibration damper should be replaced.

Tighten the fixing bolt with a torque wrench VAG 1601.
Install vibration damper and lock key to lock the T10069.
Tighten the new fixing bolt with a torque of 100 Nm + 1/4 turn (90 ?�).
Install poly V-belt.


« previos page
Removing and installing oil seal on the flywheel side
next page »
Replacement of sealing flange on the side of the crankshaft vibration damper

Copyright © 2010 AutoManuals.biz. Trademarks belong to their respective owners. All rights reserved.